Hatching with Open Boundaries
In practice, hatches are one of the most frequently used features in many drawings. Hatches let you add texture to entities, help you differentiate parts, surfaces, and materials, thus providing more clarity.
Adding hatches is not difficult, however, there is one important aspect: you can only hatch closed boundaries!
If a boundary is not closed, the application cannot determine the area to hatch. To complete the hatch, you must find and close all gaps.
Most probably, your drawings contain lots of gaps. For example, a typical floor plan will always have rooms with doors.
Instead of finding and closing gaps one by one, which is time consuming and would require patience and attention, you can use a more convenient method, which involves two steps:
- Set a gap tolerance to compensate for any boundary gaps.
You can specify the gap tolerance:
- In the Hatch / Fill dialog box, Additional Options.
- On the contextual ribbon: Hatch Creation > Additional Options
- With the HPGAPTOL system variable
The gap tolerance must be greater than the size of the gap in drawing units.
- Once the gap tolerance is set, you can correctly hatch all boundaries with gaps within the specified tolerance. The command considers the boundaries closed and creates the hatch. If the gap is greater than the specified tolerance value, the message informs you that the hatch cannot be created.
To hatch a boundary with gap:
- Do one of the following:
- In the graphics area, specify a point within the boundary.
If the boundary is not closed, a warning message informs you that gaps have been detected and the boundary cannot be determined. Red circles appear at endpoints near the gap.
 You cannot select and manipulate the red circles. Use Rebuild or RebuildAll if you no longer need them displayed.
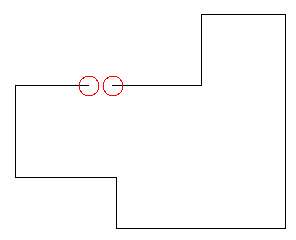
- You can do one of the following:
- Cancel the Hatch command.
- Find the gaps, close them and complete the hatch, which would be time consuming.
- Specify a gap tolerance and hatch all boundaries.
- Specify a gap tolerance for open boundaries:
- On the ribbon, select Hatch Creation > Additional Options.
- In Gaps, specify a maximum gap size.
Note: The gap tolerance must be greater than the size of the gap in drawing units.
- Once the gap tolerance is set, you can correctly hatch all boundaries with gaps within the specified tolerance. The command considers the boundaries closed and creates the hatch. If the gap is greater than the specified tolerance value, the message informs you that the hatch cannot be created. To continue hatching, you must change the gap tolerance.
Access
Command: Hatch
Menu: Draw > Hatch
Tool Palettes: Draw > Hatch