Creating Patterns of Entities
Use the Pattern command to create copies of specified entities
- as a circular pattern, or
- in a linear pattern,
According to these types, the Pattern dialog box displays three tabs (Circular, Linear, and Path).
The copied entities inherit all properties of the original entities such as Layers, LineColors, LineStyles, and LineWeights.
You can create associative and non-associative patterns. Entities within associative patterns retain their relationships. Associative patterns let you edit them in their entirety instead of changing the individual items in the pattern. In non-associative patterns, editing one item does not affect the other items.
To make patterns associative, activate the Associative option in the Settings section on the Circular or Linear tab of the Pattern dialog box.
To edit associative patterns, see Modifying Associative Patterns.
To undo the associativity of patterns, use the Explode command.
3D Patterns
You can create associative and non-associative 3D linear or circular patterns.
For 3D linear patterns, you can also specify the number of levels in the Z direction.
For 3D circular patterns, you can specify the axis of rotation with any two points in space.
Circular patterns
You can create a circular pattern by copying a specified entity around a specified center point. You control the number of copies. Additionally, you can rotate the copies as they are patterned, otherwise they maintain the alignment of the source entities.
The software determines the radius of the circular pattern based on the distance between the specified axis point and a base point on the specified entity. You can use a snap point as base point or you can specify another point.
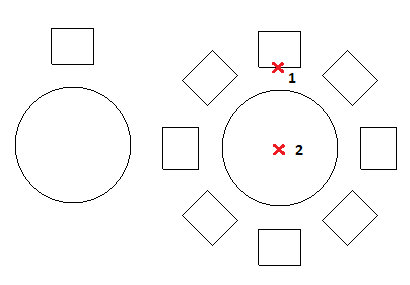
Example:
A circular pattern with 8 items, fill on 360°.
To create a circular pattern:
- Do one of the following:
- On the ribbon, click Home > Modify > Pattern.
- On the menu, click Modify > Pattern.
- Type Pattern.
- In the dialog box, click the Circular tab.
- Under Selection, click Specify entities
 . Select the entities to generate the pattern, and press Enter to complete the selection.
The dialog box disappears when your selection is complete.
In the dialog box, the collection of specified entities is referred to as elements.
- Under Settings, specify whether the pattern is created associatively or non-associatively.
- Specify the circular pattern properties.
- Click OK.
 Note: In the Pattern dialog box, click Preview to check the resulting pattern without creating it. You can use this option and return to the dialog box as many times as needed, then click OK to generate the pattern.
Linear patterns
You can create multiple copies of entities in a linear pattern.
You can specify the number of rows and columns and the distance between them.
To create a linear pattern:
- Do one of the following:
- On the ribbon, click Home > Modify > Pattern.
- On the menu, click Modify > Pattern.
- Type Pattern.
- In the dialog box, click the Linear tab.
- Click Specify entities , select the entities to generate the pattern, and press Enter to complete the selection.
The dialog box disappears when your selection is complete.
In the dialog box, the collection of specified entities is referred to as elements.
- Under Settings, specify whether the pattern is created associatively or non-associatively.
- Specify the linear pattern properties.
- Click OK.
Note: In the Pattern dialog box, click Preview to check the resulting pattern without creating it. You can use this option and return to the dialog box as many times as needed, then click OK to generate the pattern.
Patterns along a path
To create a pattern along a path:
- Do one of the following:
- On the ribbon, click Home > Modify > Pattern.
- On the menu, click Modify > Pattern.
- Type Pattern.
- In the dialog box, click the Path tab.
- Click Specify entities , select the entities to align along a path, and press Enter to complete the selection.
The dialog box disappears when your selection is complete.
In the dialog box, the collection of specified entities is referred to as elements.
- Click Specify path and select the entity that defines the path to align the specified entities along.
The path can be a Line, PolyLine, Arc, Circle, Ellipse, or Spline.
- In Settings, specify the path pattern properties.
- Click OK.
Note: In the Pattern dialog box, click Preview to check the resulting pattern without creating it. You can use this option and return to the dialog box as many times as needed, then click OK to generate the pattern.
Access
Command: Pattern
Menu: Modify > Pattern
Ribbon: Home > Modify > (Flyout) Pattern 
Tool Palettes: Modify > Pattern