Splitting a BIM Drawing Across Multiple Sheets
When working with larger BIM projects, sections, plans, or elevations that have been created from the BIM model might be too large to fit on a single sheet. Also, drawings can be much larger than the sheet size.
In such situations, a possible solution is to split the drawing in rectangular parts and show each part on a separate sheet, at a suitable scale. After printing, matching the printed view tiles forms the primary drawing.
The BIMSplitDrawing command lets you split a specified area of a drawing into multiple equal crop tiles.
Crop tiles that you have specified in the primary view generate a set of so called dependent views. Dependent views provide exact copies of the corresponding crop tile from the primary view.
In the BIM Navigator, dependent views appear grouped under the primary view.
From the BIM Navigator, you can do the following:
- Display the crop tile for each dependent view. In the graphics area, the corresponding crop tile appears in a dashed line.
- Delete dependent views. You can delete dependent views all at once or one by one.
The basic workflow for working with BIM models includes the following steps:
- Prepare the view that you want to split.
Add all the necessary information. Plan the size of the area to split and the size of the crop tiles. The size of the tiles should be determined based on the sheet format. For example, to print a drawing on an A3 sheet, the crop tiles should fit on A3.
- Define the area to split.
On the primary drawing, specify two diagonal corners to define a rectangular area.
- Define the crop tiles.
Define the crop tiles corresponding to each part of the drawing to display in the dependent view. You can split the drawing
- Based on a template (available sheet format)
- Based on defined rectangular areas
- Create the sheets on which to place the dependent views
- Place each dependent view on a separate sheet.
To split a BIM drawing into rectangular crop tiles:
Before starting, backup the drawing that you want to split.
- In the BIM Navigator, select the drawing to split.
Note: You cannot split a drawing that is already split. To modify the crop tiles, delete all dependent views and split the drawing again.
- Do one of the following:
- On the ribbon, click BIM > Drawing > Split Drawing.
- On the menu, click BIM >Drawing> Split Drawing.
- Type BIMSplitDrawing.
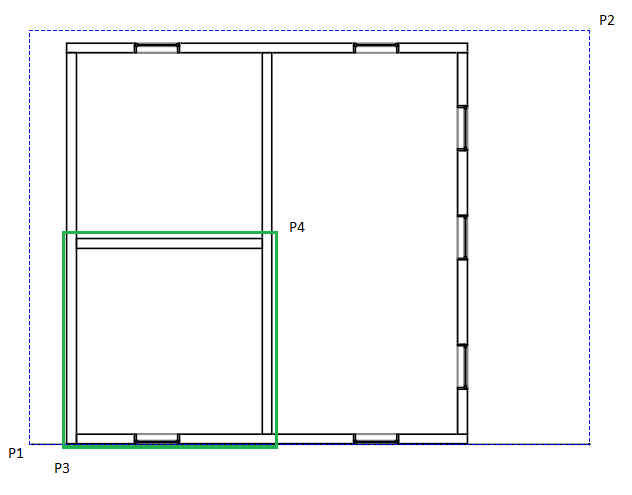
- In the graphics area, specify the first corner of the drawing area to split (P1).
- Specify the opposite corner of the drawing area to split (P2).
- Specify the first corner of the tile (P3).
- Specify the opposite corner of the tile (P4).
- Specify the point from which to start splitting the rectangular drawing area. For example, P3.
- If necessary, specify horizontal and vertical overlapping.
Access
Command: BIMSplitDrawing
Menu: BIM > Drawing > Split Drawing
Ribbon: BIM > Drawing > Split Drawing
Parent Topic