Creating Patterns of Hatches
Use the PatternHatch command to create hatches using block entities, images, external references or masks.
You can save configurations as favorites for later use in other projects and drawings.
 Note: You cannot save the selected boundary, as it depends of the drawing. Thus you can apply the hatch to any other shapes and boundaries.
To create a pattern of hatches from blocks, images, or external references:
- Do one of the following:
- On the ribbon, click XtraTools > Draw > Pattern Hatch.
- On the menu, click XtraTools > Draw > Pattern Hatch.
- Type PatternHatch.
- In the dialog box, in Type, select the pattern type to use for the hatch:
- Block. Lets you select a predefined block and use it for the hatch pattern.
- Image. Lets you select an image.
- External reference. Lets you select an external reference file for the hatch pattern.
- Mask. Lets you use a mask object for the hatch pattern.
- In Pattern, click Browse
 and select the block, image or external reference file to use as pattern.
 - In Size and position, specify options:
- Specify X and Y scale value by which to scale the hatch pattern.
- Specify the horizontal and vertical distance between patterns.
- Specify the origin or initial pattern position. You can use Specify entities
 to select the origin in the graphics area.
 - Specify the rotation angle of the pattern. You can use Rotation angle
 to define the rotation angle in the graphics area.
Note: You can use Extract from entity to extract the pattern type and the name from an entity from the drawing. Thus you can place a pattern on the drawing and create a hatch with it. - Select a method to specify the boundaries:
- Specify entities
 . Lets you select the entities that form the boundary.
 - Specify points
 . Lets you click points in enclosed areas to define the boundaries.
 - Rebuild boundary
 . Replaces a boundary after removing (enabled only when using the EditHatch command).
 - Delete boundary entities
 . Removes boundaries from the set of entities that form the boundaries.
 - Highlight boundary entities
 . Displays the boundaries in the drawing.
- Specify entities
- In Type of entities, specify if you want to create the hatch as an anonymous block or as a group of entities. If Mask is selected the hatch can only be created as block entity.
It is recommended to create the hatch as block so you can edit it. You cannot edit groups of entities.
- In Limits, define the hatch behavior at boundary:
- Cut entities: When enabled, cuts the pattern entities that surpass the specified boundary. When disabled the pattern entities can surpass the limits. For example, you can use this option when representing trees on a terrain and you do not want the trees representations to be cut.
- Draw surpassing entities: When disabled, the entities that surpass the boundary limits are not displayed. For example, you can use this option when representing parking places in a parking and you do not want to display any place that surpasses the defined boundary.
- In Tolerance for curves, specify the precision for the approximation of curved boundaries (the maximum distance between the midpoint of any given segment and the arc).
Note: When working with blocks or images, standard limiter boundaries are used. Standard limiter boundaries can only contain straight segments, so when the boundary contains curved segments it must be converted to a similar shape using straight segments.
- Click Preview to check the resulting hatch without creating it.
You can preview the result as many times as necessary.
- Click OK.
To create a pattern of hatches from mask:
- Do the following:
- On the ribbon, click XtraTools > Draw > Pattern Hatch.
- On the menu, click XtraTools > Draw > Pattern Hatch.
- Type PatternHatch.
- In the dialog box, in Type, select Mask.
- Select a method to specify the boundaries:
- Specify entities . Lets you select the entities that form the boundary.
- Specify points . Lets you click points in enclosed areas to define the boundaries.
- Rebuild boundary . Replaces a boundary after removing (enabled only when using the EditHatch command).
- Delete boundary entities . Removes boundaries from the set of entities that form the boundaries.
- Highlight boundary entities . Displays the boundaries in the drawing.
- Specify entities
- In Limits, define the hatch behavior at the boundary:
- Cut entities: When enabled, cuts the pattern entities that surpass the specified boundary. When disabled the pattern entities can surpass the limits. For example, you can use this option when representing trees on a terrain and you do not want the trees representations to be cut.
- Draw surpassing entities: When disabled, the entities that surpass the boundary limits are not displayed. For example, you can use this option when representing parking places in a parking and you do not want to display any place that surpasses the defined boundary.
- In Tolerance for curves, specify the precision for the approximation of curved boundaries (the maximum distance between the midpoint of any given segment and the arc).
Note: When working with blocks or images, standard limiter boundaries are used. Standard limiter boundaries can only contain straight segments. When the boundary contains curved segments it must be converted to a similar shape using straight segments.
To define a pattern and save it in favorites:
- Do one of the following:
- On the ribbon, click XtraTools > Draw > Pattern Hatch.
- On the menu, click XtraTools > Draw > Pattern Hatch.
- Type PatternHatch.
- In the dialog box, in Type, select the pattern type to use for the hatch: Block, Image, External reference, or Mask.
- In Pattern, click Browse and select the block, image, or external reference to use as pattern.
- Specify options for the pattern and specify the boundary. See To create a pattern of hatches from blocks, images or external references.
- In the Favorites section, in Name, type the name of the configuration.
- Click Save favorite
 .
You can save in Favorites as many predefined configurations as you need.
.
You can save in Favorites as many predefined configurations as you need.
To delete a pattern configuration from favorites:
- In the dialog box, from the Name list, select the pattern configuration to remove from favorites.
- Click Remove favorite
 .
.
Example
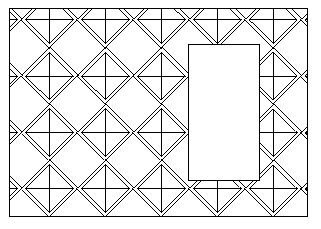
In this example, a block is used to hatch the following closed area.
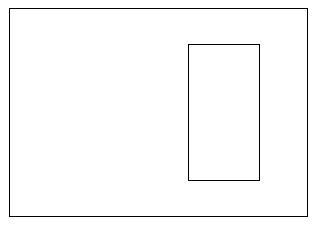
Draw the geometric entities and define the block.

Use the following setings:
- Enable Cut entities.
- Enable Draw surpassing entities.
Area hatched with the defined block:
Access
Command: PatternHatch
Menu: XtraTools > Draw > Pattern Hatch
Ribbon: XtraTools > Draw > Pattern Hatch
Parent Topic