Constructing Rectangles
You can draw Rectangles with any size or orientation in the plane with square, filleted, or chamfered corners.
The Rectangle command provides the following options:
Corner. Creates a rectangle by specifying two opposite corner points.
3 Point Corner. Creates a rectangle by specifying three points.
3 Point Center. Creates a rectangle by specifying the center of the rectangle, the mid-point of a side and a corner.
Center. Creates a rectangle by specifying the center of the rectangle and a corner.
Parallelogram. Creates a parallelogram by specifying three corner points.
Note: You cannot create parallelograms with chamfered or filleted corners.
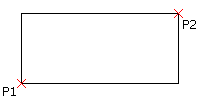
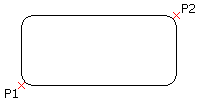
To construct a rectangle from two opposite corner points:
Click Draw > Rectangle (or type Rectangle).
In the graphics area, specify the start point of the rectangle or specify an option:
Chamfer. Lets you specify the chamfer distances for each corner.
Elevation. Lets you specify the elevation of the rectangle in 3D.
Fillet. Lets you specify the fillet radius for each corner.
Thickness. Lets you specify the thickness of the rectangle walls in 3D.
Line width. Lets you specify the 2D line width of the rectangle walls.
In the graphics area, specify the opposite corner of the rectangle or specify an option:
Area. Defines the rectangle by the area and the length or width. (Chamfering or filleting of corners is incorporated into rectangle area calculations.)
Dimensions. Defines the rectangle by length and width.
Rotation. Rotates the length side of the rectangle by a specified angle before specifying the opposite corner.
To specify rectangle options:
Type Rectangle at the command prompt.
Specify an option:
Chamfer. Lets you specify the chamfer distances for each corner.
Elevation. Lets you specify the elevation of the rectangle in 3D.
Fillet. Lets you specify the fillet radius for each corner.
Thickness. Lets you specify the thickness of the rectangle walls in 3D.
Line width. Lets you specify the 2D line width of the rectangle walls.
Note: The specified options remain active until you will specify other options.
Press Enter.
Repeat step 2 and 3 as necessary to set the options.
Press Esc to exit the command or specify an option to draw a rectangle.
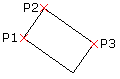
To construct a rectangle from three points:
Click Draw > Rectangle > 3 Point Corner (or type Rectangle then specify the 3Corner option).
In the graphics area, specify:
First corner point.
Second corner point to define the first side of the rectangle.
Third point.
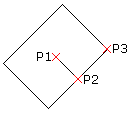
To construct a rectangle from the center, mid-point, and a corner point:
Click Draw > Rectangle > 3 Point Center (or type Rectangle then specify the 3Point center option).
In the graphics area, specify:
Center point of the rectangle.
The mid-point of a side.
A corner point.
To construct a rectangle from the center point:
Click Draw > Rectangle > Center (or type Rectangle then specify the Center option).
In the graphics area, specify:
Center point of the rectangle.
A corner of the rectangle.

To construct a parallelogram:
Note: You cannot create parallelograms with chamfered or filleted corners.
Click Draw > Rectangle > Parallelogram (or type Rectangle then specify the Parallelogram option).
In the graphics area, specify:
First corner of the parallelogram.
Second point to define the first side of the parallelogram.
Specify the third point of the parallelogram.
Regular rectangle:
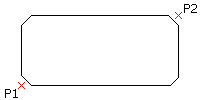
Rectangle with **Chamfer* option:*
Rectangle with **Fillet* option:*
Access
Command: Rectangle
Menu: Draw > Rectangle
Tool Palettes: Draw > Rectangle
Ribbon: Home > Draw > Rectangle > Corner
Home > Draw > Rectangle > Center
Home > Draw > Rectangle > 3 Point Corner
Home > Draw > Rectangle > 3 Point Center
Home > Draw > Rectangle > Parallelogram
Related Topics