Constructing 2D Spirals and 3D Helixes
Use the Helix command to construct 2D spirals and 3D helixes.
Spirals and helixes are entities of their own. You can use 2D spirals and 3D helixes as paths to create threads, springs, and spiral stairs. For example, you can sweep a 2D entity along a helix and create threaded bolts.
You can create the following entities:
2D spirals
Conical 3D helixes
Cylindrical 3D helixes
You create 3D helixes around an axis that defines their location and position. You define the axis by specifying two points (the base center point and the top center point) or by specifying the base center point and the height. The helix axis can be vertical or sloped.
After you create a helix, you can modify it using EntityGrips or the Properties palette. See Modifying 2D Spirals and 3D Helixes.
Helix Parameters
To sketch a helix, specify these parameters:
Axis position. Defines the helix position. Specify the axis’ base center point and end point.
Base radius or Base diameter. Defines the helix base (the circle created by the helix when seen from the top) by specifying the base radius or diameter.
Top radius or Top diameter. Defines the helix top circle by the top radius or diameter. The base and top radii or diameter must not be zero.
To create a cylindrical helix specify the same value for both the base radius (or diameter) and top radius (or diameter).
To create a conical helix specify different values for the base radius (or diameter) and top radius (or diameter).
Height. Defines the helix height and the direction in the Z axis.
Positive value. Creates the helix (spiral) towards the positive direction of the Z axis.
0 (zero). Creates a 2D spiral.
Negative value. Creates the helix (spiral) towards the negative direction of the Z axis.
Revolutions. Specifies the number of revolutions for the helix. After specifying the height, the command draws the specified number of revolutions evenly distributed.
Pitch. Specifies the distance between two revolutions, measured along the helix axis. If you specify a pitch, the number of revolutions is automatically calculated. The higher the pitch, the lower the number of revolutions.
Direction. Defines the direction in which the helix is twisted: clockwise (CW) or counterclockwise (CCW).
|
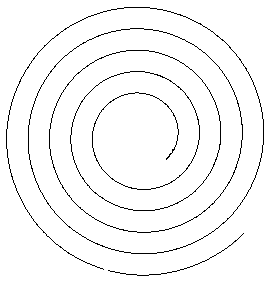
Number of revolutions = 3 |

Creation Methods
You can create 3D helixes by specifying the:
height (other parameters have default values)
number of revolutions and height. The number of revolutions are created within the specified height, at equal distances.
pitch and height. The number of revolutions is automatically calculated.
pitch and number of revolutions for the spiral. The height is automatically calculated.
To construct 2D spirals:
Do one of the following:
On the ribbon, click Home > Draw > Helix.
On the menu, click Draw > Helix.
Type Helix.
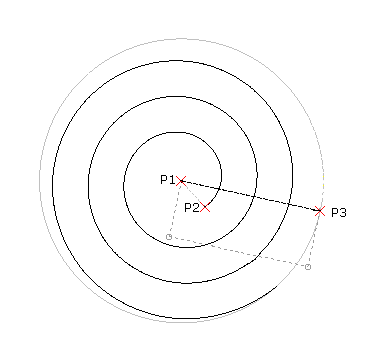
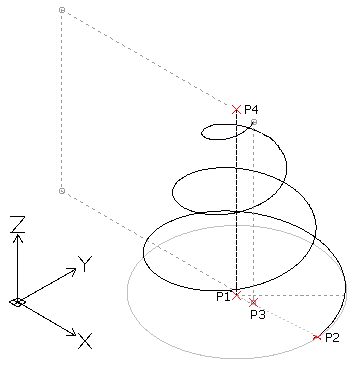
In the graphics area, specify the base center point (P1) to define the 2D spiral position.
Do one of the following:
Specify a point (P2) to define the base radius.
This point defines the start point.

- or -
Do the following:
Type a value to define the base radius.
Specify the start angle.
Specify the Diameter option and do the following:
Specify the base diameter.
Specify the 2D spiral start point or type the start angle value.
Specify the top radius (P3).
- or -
Specify the Diameter option and specify the top diameter.
Specify the Direction and Revolutions options as needed. See Helix Parameters.
For example, specify 5 for the number of revolutions.
Specify 0 for the height of the helix.
After creating the spiral, you can modify it using EntityGrips or the Properties palette. See Modifying 2D Spirals and 3D Helixes.
To construct 3D helixes:
Do one of the following:
On the ribbon, click Home > Draw > Helix.
On the menu, click Draw > Helix.
Type Helix.
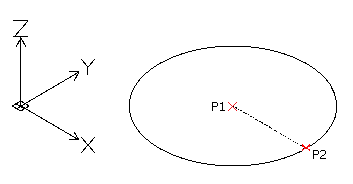
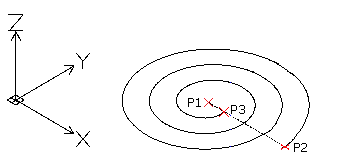
In the graphics area, specify the base center point (P1) to define the helix position.
Do one of the following:
Specify a point (P2) to define the base radius.
This point defines the helix start point.
- or -
Do the following:
Type a value to define the base radius.
Specify the start angle.
- or -
Specify the Diameter option and do the following:
Specify the base diameter.
Specify the helix start point or type the start angle value.
Specify the top radius (P3).
- or -
Specify the Diameter option and specify the top diameter.
Note: The default value of the top radius (or diameter) is always the value of the base radius (or diameter). Use the default value of the top radius (or diameter) to create a cylindrical 3D helix.
Specify the height of the helix (P4).
- or -
Use the following options as needed. See Helix Parameters.
Axis endpoint. Specifies the end point of the helix axis. The end point defines the length of the axis and orientation of the helix.
 Tip: You can specify the axis endpoint anywhere in the 3D environment. Use this option to sketch the helix at an angle.
Direction. Specifies the direction in which the helix is twisted.
Pitch. Specifies the distance between two revolutions of the helix.
Revolutions. Specifies the number of revolutions of the helix.
Press Enter.
After creating the helix, you can modify it using EntityGrips or the Properties palette. See Modifying 2D Spirals and 3D Helixes.
Modifying 2D Spirals and 3D Helixes
Use EntityGrips or the Properties palette to modify 2D spirals and 3D helixes.
Use EntityGrips to modify the following properties:
Axis position
Start point
Base radius
Top radius
Height
Direction in Z axis
Use the Properties palette to modify other properties, such as:
Twist direction
Number of revolutions
Pitch
Additionally, you can select a Constraint, the dimension that remains constant when you create or modify helixes:
Pitch. The pitch value is constant. As the height changes, the number of revolutions is calculated.
Revolutions. The number of revolutions is constant. As the height changes, the distance between revolutions is calculated.
Height. As the height changes with the EntityGrip, the number of revolutions is unchanged and the distance between revolutions is calculated.
Access
Command: Helix
Menu: Draw > Helix
Ribbon: Home > Draw > (Flyout) Helix
Related Topics
Parent Topic