Creating Centerline Crosses with Angles
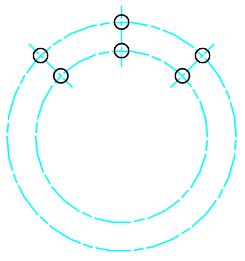
Use the AM_CenCrAngle command to place holes along concentric circles at specified angles.
By default, holes are represented as centerline crosses with circles. Optionally, you can place centerline crosses only.
To create centerline crosses at specified angles on a circular contour:
Do one of the following:
On the ribbon, click Home > Centerlines > Centerlines > Centerline cross with Angles.
Type AM_CenCrAngle.
In the graphics area, specify the center of the pitch circle.
Specify the diameter value for the pitch circle.
 To draw multiple concentric circles at once, specify a set of diameter values separated by |.
Specify the No hole option to create the centerline crosses.
Specify the diameter for the centerline cross.
Specify the angle at which the centerline crosses are to be placed on the circle.
Press Enter.
To create centerline crosses with holes at specified angles on a circular contour:
Do one of the following:
On the ribbon, click Home > Centerlines > Centerlines > Centerline cross with Angles.
Type AM_CenCrAngle.
In the graphics area, specify the center of the pitch circle.
Specify the diameter value for the pitch circle.
To draw multiple concentric circles at once, specify a set of diameter values separated by |.Type a value for the diameter of the circle that represents the hole.
Alternatively, you can define the diameter by specifying two points in the graphics area.
To draw multiple concentric circles at once, specify a set of diameter values separated by |.Specify the angle values separated by | s at which the centerline crosses should be placed on the circle.
Access
Ribbon: Home > Centerlines > Centerlines > Centerline cross with Angles
Command: AM_CenCrAngle
Related Topics
Parent Topic